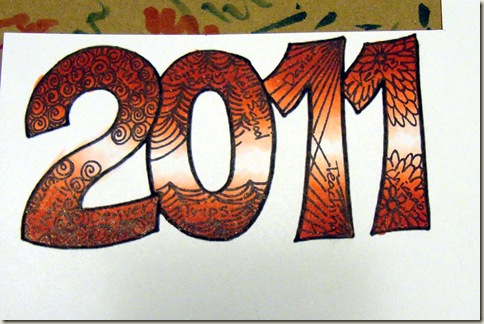
If you are a regular here at Get It Scrapped! you probably already know about the amazing “One Month At A Time” articles my friend Tami writes. I have been playing along and completing the sketches all year so I thought it would be great fun to create an image to go right into my end of year, start of new year, layout.
On this printable sheet you will get both 2010 and 2011 so you can choose what type of project you want to play with.
 I also decided I would show you two very different ideas with the same simple image so I will share the first here and get the second one to you in just a couple weeks. Today we are going to do a gradation of color from top and bottom into the middle and then I am going to add a little optional pizzazz at the end. Today I am using R20,R22, R24, R29 and my colorless blender marker. Get your images printed and let’s get coloring.
Step #1
I am starting with my darkest today (R29) and using a feather stroke to feather from the top downward about ½ inch and from the bottom upward about ½ inch.
Step #2

Using your middle color (R24) start a feather stroke from about ¼ inch in the darker another ¼ inch lower do the same at the bottom. You might need to use some small circular strokes where the two overlap to create a smooth blend.
Step #3
Using your lightest color (R22) start about ¼ inch in your middle color and feather down another ¼ inch, upward as well. Smooth out your transition between colors with more feathering or small circular strokes.
Step #4
I am using a fourth color this time but if you do not have one go straight to step #5. I am using R20 to do one last layer exactly like the two above.
Step #5
Switch to your colorless blender marker and feather from the white area into your color both top and bottom. The goal is to create a smooth gradation or fade into white. Depending how heavy handed you are with your color this transition might take a little work and a little practice.
Step #6
Complete all the rest of the numbers the same way.
*** One alternative step. Before you begin, color your entire number with your colorless blender. By putting down this base coat you might have an easier time blending all the way to white.
Step #7
I have added one last step, well, because I am me. I decided to fill my numbers in with doodling and a few fun words about the past year. Because I am working on top of my Copic ink I can use any black marker. If I wanted to do the doodling first and then fill some of the doodles I would need to use a Copic Multiliner or another compatible marker.
I hope you can put these numbers to use on your 2010 or 2011 layout or a fun new year project. Check back in a couple weeks and I will do something totally different with my numbers![mhoughton]


