Modeling paste adds texture and dimension to scrapbook pages in a variety of ways. We’ve got ideas for actual modeling paste and digital equivalents.
Amanda Jones created her own stencil to use with modeling paste by designing and cutting it from an inkjet transparency with her die-cutting machine. She says, “As the subject of my page was the fact that my son is on the go 24-7 I created a tumbling number effect leading down toward my page title. To echo the outdoor theme of the photos I covered a small rectangle of scrap paper with a thick layer of paste and scraped lines into it with a palette knife to resemble a woodgrain pattern. I then spritzed it with green mist and added a little distress ink around the edges.”
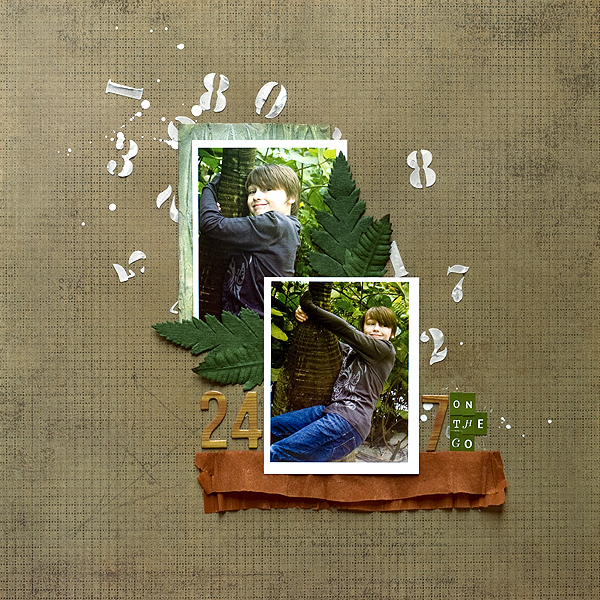
24/7 by Amanda Jones | Supplies:Basic Grey – Patterned paper; American Crafts – Chipboard Thickers; My Little Shoebox – Mini Alphas; Studio Calico – Mr Huey, white; Tattered Angels – Glimmer Mist, olive; Ranger – Tim Holtz Distress Ink, frayed burlap; Other – Inkjet transparency, modeling paste, paper fern leaves, vintage crepe paper.
Leah Farquharson used modeling paste in a subtle way on “Making Peach-Cherry Jam. She says, “I love how adding the modeling paste using a star stencil, and then just leaving it uncolored, added another layer of texture to this layout. Subtle and pretty to just accent the photo that I chose in telling my story.”
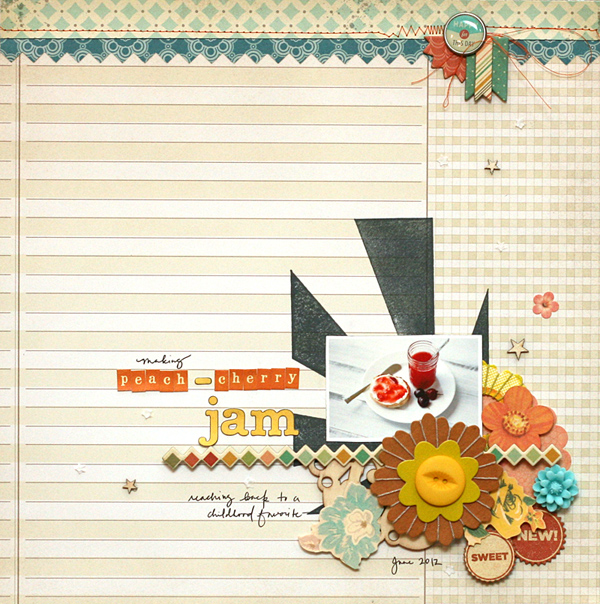
Cherry Jam by Leah Farquharson | Supplies: patterned papers: My Mind’s Eye, Studio Calico. Burst stamp: Studio Calico. Ink: American Crafts. Chipboard Shapes: My Mind’s Eye. Flower stickers, layered embellishments, flower diecuts:Sassafras Lass. Letter Stickers: Jillibean Soup. Wooden Doily: Maya Road. Border Punch: American Crafts. Wooden Stars: Studio Calico. Carbuncle Flower: Prima Marketing. Stencil: Crafter’s Workshop.
Jennifer Matott used light modeling paste from Golden Paints with a palette knife through a vinyl place mat that she got at a museum shop. She says, “I pushed it through and then added spray ink and glitter to embellish. I wanted to create a feeling of texture and a background that gives interest.”
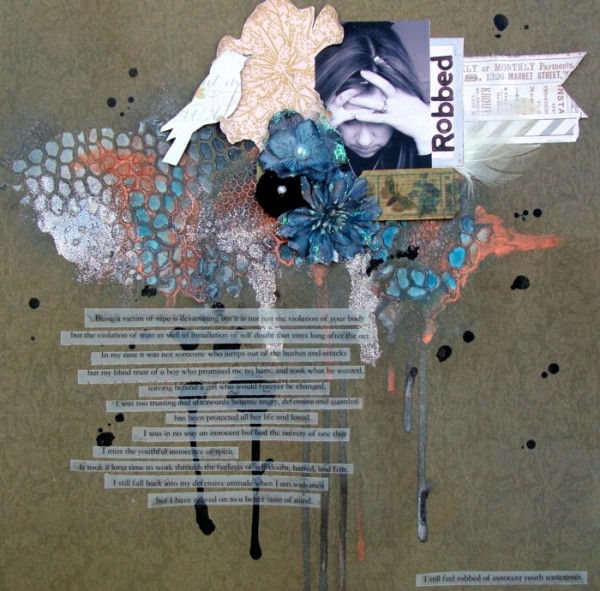
Robbed by Jennifer Matott | Supplies: September Scrapbooking From The Inside Out Kit; Vellum; Inks: Windsor & Newton, Illuminarte, and Tattered Angels Glimmer Mist in Rolling Tide; Light Modeling paste: Golden Paints; Glitter: American Crafts
Dina Wakley says “I have a serious addiction to modeling paste. It adds amazing texture and dimension. For this layout, I started with an inky stencil blot. Then I added the modeling paste over the ink. I also painted through a stencil. All of those elements combine to give lots of visual texture.”
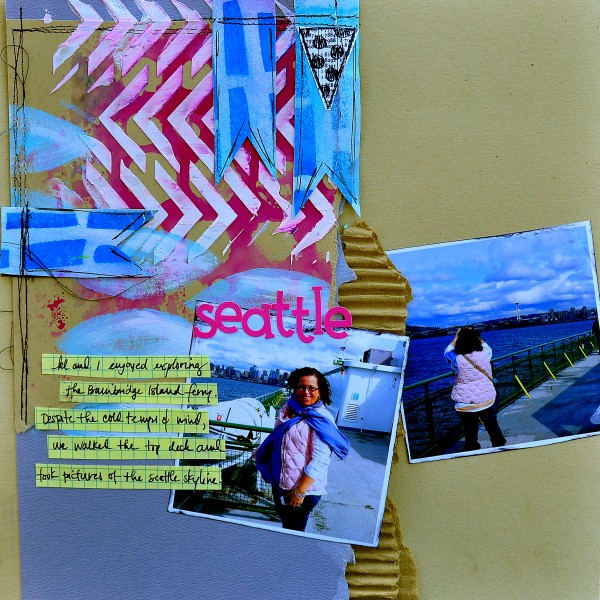
Supply List: Cardstock: Bazzill; Ink: Dylusions by Ranger; Stencil: Crafter’s Workshop; Stamp: Dylusions by Ranger; Paint: Liquitex; Cardboard: shipping supply from PaperMart; Alphabet: Doodlebug; Graph Paper: from office supply store; Pen: Fude Ball; Ink Pad: Ranger Black Archival
Ashley Horton says, “Using Modeling Paste is a great way to add texture without a lot of bulk. I used a reverse Chicken Wire mask from The Crafter’s Workshop and a credit card to spread the paste over the mask. Once I applied the paste to the spot I wanted to fill on my layout, I removed the mask and let it dry. It doesn’t take too long for the paste to dry. After it was completely dry, I used an ink pad and brushed it over the Modeling Paste, until the color covered the surface of the Chicken Wire design. I added a little bit of Spray Mist, by sprinkling it over the page, using the nozzle from the bottle.”
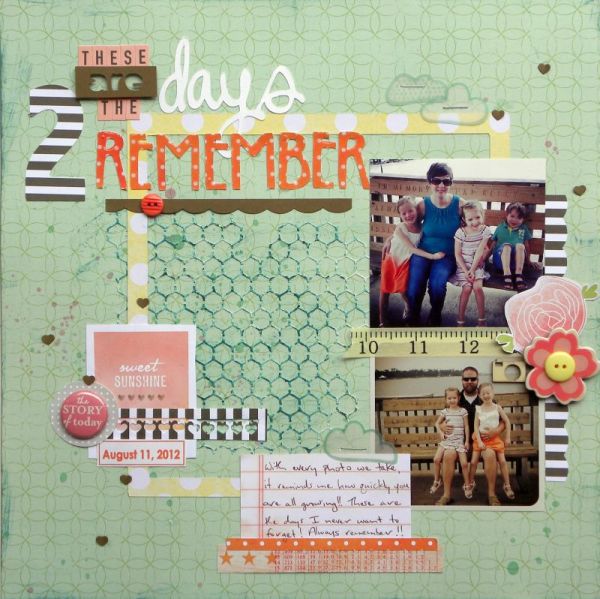
These Are the Days 2 Remember by Ashley Horton | Supplies: Patterned Paper, Chipboard, & Vellum Papaer: American Crats; Modeling Paste: Liquitex; Tin Pin & Mini Market Stickers: October Afternoon; Punch: Anna Griffin; Font: Chelsea Studio & Abadi MT Condensed; Wood Veneer & Mister Huey’s Spray Mist: Studio Calico; Chicken Wire Mask: The Crafter’s Workshop; Ink: Close to My Heart
Katie Scott Katie Scott used the waste from a Basic Grey alphabet set as a stencil to create a grid of circles with modeling paste. She wasn’t happy with the stencil work but ended up using the frame which had modeling paste on it. She says, “It reminded me of something old and beaten, which made me think of phots of my grand-uncle who I never met, he was similarly old and beaten having been in a serious accident as a child, sustaining a head injury in WWII and then passing away suddenly at age 38.”
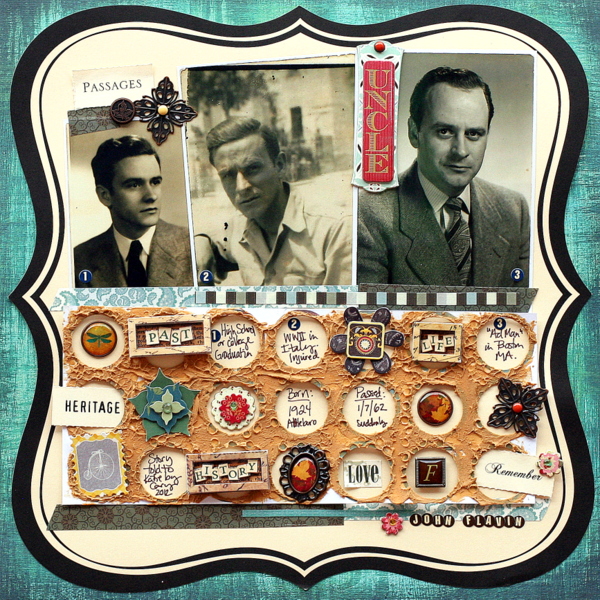
John Flavin by Katie Scott | upplies: Basic Grey & Jenni Bowlin Papers; Modeling Paste: Delta “Texture Magic” in Cashmere; Heidi Grace fabric stickers; Bo Bunny dimensional embellishments; sharpie.
Kiki Kougioumtzi made a brick wall stencil by cutting a mylar sheet and then spread modeling paste over it. She says, “There is also modeling paste at top left which is stamped into while wet. At lower right is a bit of modeling paste covered with patterned paper. The modeling paste when completely dried was colored with distress inks for more definition. The background patterned paper is glued randomly on the cardstock and then torn out.”
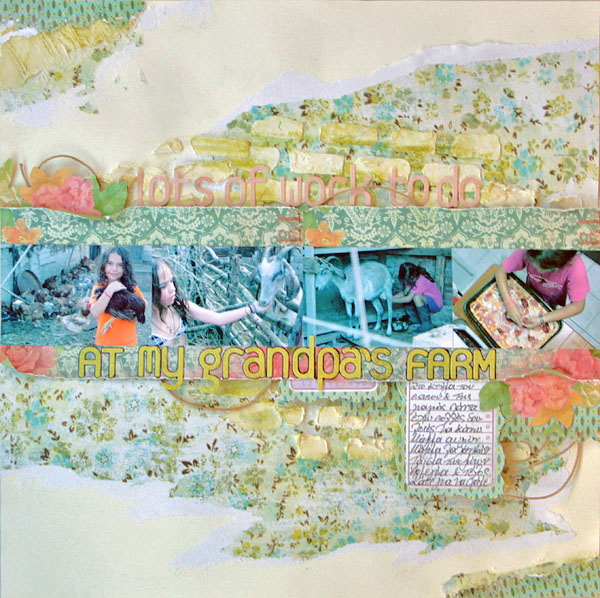
At My Grandpa’s Farm by Kiki Kougioumtzi | Supplies: Supplies: Patterned paper:My Mind’s Eye, 7Gypsies, Basic Grey; Cardstock:Canson; Alphas & Stickers:Basic Grey; Ink:Ranger; Modeling paste:Liquitex; Stamp:American Crafts; Paper punches:Fiskars, Martha Stewart; Other: Mod Podge, twine.
Michelle Houghton enjoys finding new ways to spice up layouts and modeling paste is one of the tools she’s using lately. On “b-day girl” she died her paste with Tattered Angel’s Glimmer mist first then used painter’s tape to mask the shape of a hat right on top of the photo. She added the blue modeling paste to the masked off area add added beads into the wet paste. She says, “Before the paste had completely dried I removed the tape and added the ribbon trim and individual flower top to the hat with a wet adhesive.” Michelle also added a light strip of paste below the larger photo.
Michell’s tip for dying modeling paste: “Do a test run with your inks in a small amount of modeling paste and let it sit over night to dry completely before you put it on your project. I have tried a few different inks and a few have changed colors dramatically after drying.”
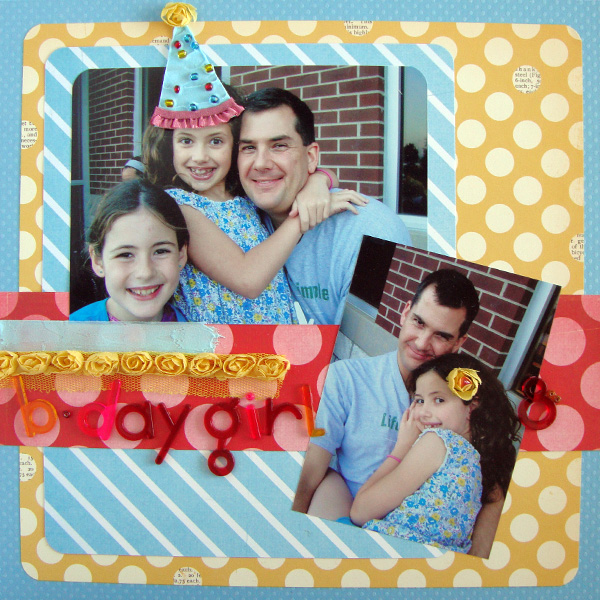
B-Day Girl by Michelle Houghton | Supplies: Cardstock – Bazzill; Patterned paper – Pink Paislee and October Afternoon; Modeling Paste – Golden; Ribbons – American Crafts; Letters – K I Memories; Beads – Darice; Ink – Tattered Angels
Paula Gilarde made a dimensional background with modeling paste mixed with paint and the packaging from a set of chipboard letters as a stencil. She says, “I wanted to convey my daughter’s interest in words and spelling using letters for my background. The end result adds a lot of dimension to the layout. I added a shipping tag, decorated with some punchinella and inks, finished off with my photo and quote.”
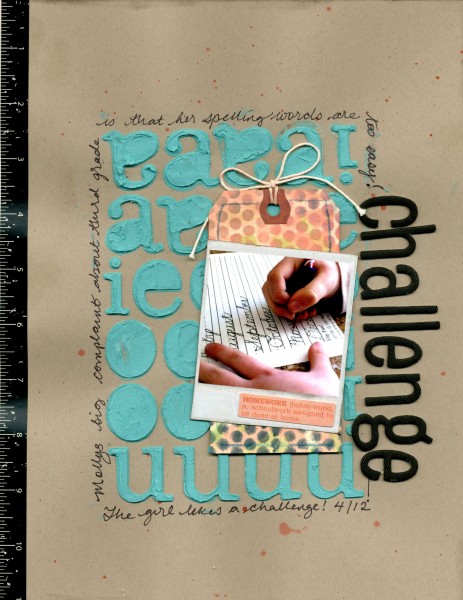
Challenge by Paula Gilarde | Cardstock – Stampin’ Up, Shipping Tag – Avery, Digital Instamtic Frame No. 3 – Katie Pertiet, Alpha – American Crafts, Border Sticker – Collage Press, Ephemera – Fancy Pants, modeling paste, paint, ink, punchinella.
Adryane Driscoll says, “I read about using modeling paste on paper before working on a digital version. Two concepts lent themselves to a digital page: (1) build the paste up in layers, and (2) use the paste on other materials, then shape those materials before applying them to your page.”
“I used a digital paint, building it up over the photo layer. The paint layers are set to various blending modes to allow the layers to show through each other. I also used the paste over lace (bottom center, top left corner). After applying the paint and blending the layers, I embossed the layers to give them a “stiffer” look. It’s common to ink over the ridges of modeling paste, so I blended digital transfers over some of the paint layers to give them an inked look.”

Dear Harriet by Adryane Driscoll | Supplies: Anna Aspnes: White Paint No.1, ArtPlay Palette Concerto, SkinnyLined Overlays No.2, ArtPlay Palette Viaggio, ArtsyKardz Viaggio, and ArtPlay Palette Sweet Pea (background)
Amy Kingsford wanted to make a mostly white page with a few hints of color and a great deal of texture for this digital wedding page for her sister in law whose married name is, in fact, White. She says, “The modeling paste background with stamped floral impressions is a digital transfer and gives this page a dimensional foundation which is enriched with my other textured white elements including the feathers and lace alphas.”

Mrs. White by Amy Kingsford | Supplies: Anna Aspnes Designs: Classico Art Play Palette, Classico Brush Set, Artsy Feathers No. 1, FotoBlendz No. 9, Warm Glows No. 1; Ju Kniepp: Lace Alpha; The Ardent Sparrow: One Fine Day Borders; Sahlin Studio: Key to my Heart Elements.
Inspired by the techniques on the pages here (but not a big “mixed-media” scrapbooker) Debbie Hodge looked at pages she had in progress for opportunities to add in art-journaling techniques. The paper cloud embellishment on ‘Hello River” presented a great opportunity for adding “digital modeling paste.”
To add digital texture to an embellishment:
- Select the area the embellishment (or part of it) fills and copy that area to a new layer. (Debbie selected the blue of the cloud with the Magic Wand tool.)
- Open texture files (here Anna Aspnes’ “White Paint 1” png files) and drag them to the layer ABOVE the copied embellishment. “Clip” them to the embellishment.
- Play with opacity and blending modes of the paint layers to get desired look.
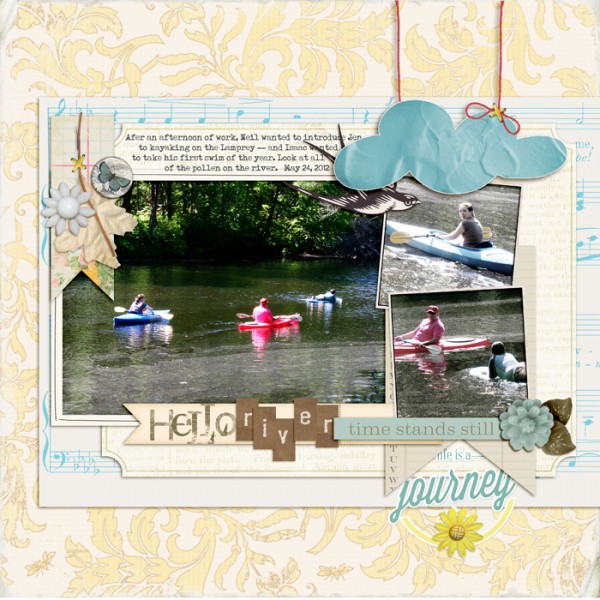
Hello River by Debbie Hodge | In Spring Distressed Paper by Lynn Grieveson; Tangerine Dream Collection by Jenni Bowlin; White Paint 1 by Anna Aspnes; Still Life, Tidbits Alpha by One Little Bird; A Simple Mixup Alpha by Lisa Sisneros; Wesley by Ardent Sparrow; Vintage Ledger Banner Journal Cards by Robyn Meierotto; A Wonderful Day; Buttoned Up Vintage, Rimmed framers by Katie Pertiet; So Far Away by Little Butterfly Wings; Retro Spring by Reverie Atelier
[current]

