by Debbie Hodge
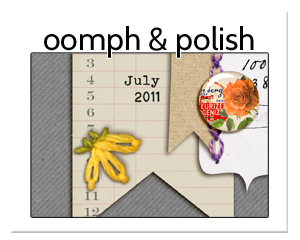
Love mixing lots of patterns on your scrapbook pages?
One of the many lessons Lisa Dickinson shared in Oomph and Polish at Masterful Scrapbook Design was this one for combining patterned papers:
Multiple patterns directly overlapping one another can be a busy look. Tone them down visually by placing them within a solid border (white or black usually work best.)
Lisa put this lesson to work on We Are Family, using her Silhouette Cameo to cut the white flower border that she backed with a variety of patterned papers.
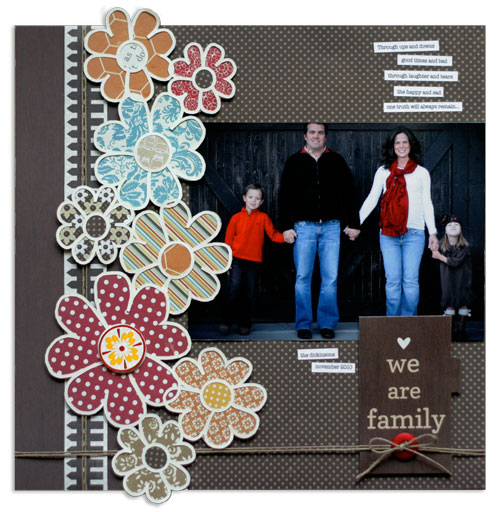
We Are Family by Lisa Dickinson | Supplies: cardstock (Bazzill Basics); patterned paper, tag,stickers (Lily Bee Design); die cut machine (Silhouette); font (American Typewriter); jute twine; button
I found these photos of my grandmother and the date was written on the back but I had to guess at the story based on the visual clues and what I know about her life at that time.
I used a left over cut out sheet where there were letters in circles; I punched out all the letters and then used the backside (which was white) of the punch out sheet and backed each circle with different bits from a few 6×6 paper pads.

Oct. 15, 1944 by Katie Scott | Supplies: Colorbok (cut out sheet); American Crafts, Crate Paper and Basic Grey Patterned Papers. American Crafts letters and Studio Calico and Crate Paper stickers.
Ashley Horton says, “Our family loves to visit this spot throughout the year, and the kids love to sit on the side of the fountain with their feet in the water.”
“I used patterned papers that included the teal and red from my photo. I layered the papers behind a a chevron die cut overlay, filling the negative space with color and pattern and providing a border between different patterns.” Hand stitched chevrons repeat the shape and the negative space from Ashley’s diecut overlay.

Lucky You by Ashley Horton | Supplies: Patterned Paper: American Crafts & Glitz Design; Wood Veneers & Spray Mist: Studio Calico; Flair Button: PandaEightDesigns; Buttons: October Afternoon; Mask: The Paper Bakery; Die Cut Machine: Silhouette Cameo; Punch: Anna Griffin
Vicki Walters used an “ArtsyGrid Overlay” from Anna Aspnes Designs as a multi-spot from for her many floral patterned papers. She added a drop shadow to the farm for dimension.

Let us dance… by Vicki Walters | Supplies: Font: Brownstone; Anna Aspnes at Oscraps; 12×12 ArtsyGrid Overlays no 1, Fruehling Paperie, Multimedia Flowers no 1 and 2, FloralArt Prints no 1, 2, 3, 10 and 11.
Sue Althouse says, “This page is about my inability to resist tempting colorful displays when shopping. I cut a white background with my Silhouette and filled it with ribbons of patterned paper similar to the colors in my photos. The patchwork border, diagonal placement of the die cut and scattering of buttons all contribute to the lighthearted, playful character of this layout.”

Color Crazy by Sue Althouse | Supplies: Patterned Paper: Bo Bunny, Crate Paper, Echo Park, Jillibean Soup, Little Yellow Bicycle; Alphabets: American Crafts, Bella Blvd.; Buttons: October Afternoon; Floss: We Are Memory Keepers; Die Cut: Silhouette (retro background)
Stefanie Semple scrapbooked a photo of her cat on the car. She says, “Hubby wanted to nip to the shops and the cat was enjoying the heat from the engine. He reversed very slowly to see just how long she would stay on the car and she tried giving him the stink eye but eventually did jump off of the car. She was so peeved.”
“I loved the shabby patterned papers here, and they seemed perfect for these outside photos and to represent my cat’s disgust. To tone them down a little, I separated the busy patterns with thin strips of plain coloured papers. There is a strong diagonal draw with the starbursts from top left to bottom right, and a visual triangle of floral elements. I made sure to have these elements draw the eye through the focal photo.”

Oh Deer! by Stefanie Semple | Supplies: River-Rose Designs: Oh Deer Another Year (complete kit), Crossbone Cuts: The Basics – Rainbow Shabby (plain papers), Cindy Schneider: Halfpack 81 – Frames (Template)
Marie-Pierre Capistran says, “This is the story of when I go visit my parents in Canada. It’s a 5-hour drive (without kids!) and I most often do it alone with my two daughters who are now 2 and 4 years old. I made a sun set since we always leave home in the morning and arrive at my parents house when the sun is down. It’s the sign that tells my daughters that we are almost there.”
“I used several patterned papers arranged in an ombre pattern. I used my exacto-knife to cut a sun center and narrow strips radiating from it to separate the patterns. I framed my grid with 2 different patterned papers that I separated with a black stitched border.”

On our way to Shefford by Marie-Pierre Capistran | Supplies: Patterned Paper: K&Company and scraps from my stash; Cardstock: Stampin’ UP!; Letters: Thickers by American Crafts; Liked and Yellow Heart Stickers: Heidi Swapp; Others: date stamp.
Deborah Wagner says, “My niece and nephews are having a good time in front of the camera here.”
“I used four love-themed pattern papers bordered by black frames. I wanted the focus to be on the photo, but loved the energy the bright colored papers brought to my titlework.”

Love Is All We Need by Deborah Wagner. Supplies: Katie Pertiet Matte Black Vintage Frames No. 4, Looking for Love Paper Pack, Painted Overlays No. 1, Arctic Whites Paper Pack, Woodshop Paper Pack No. 1, Sweet Rose Bay Paper Pack, Color My Love Kit, Hinge Pack, Email Inspiration 3-31-12; Lynn Grieveson Totally Trashed Love Paper Pack, Blackett Hall Paper Pack; Michelle Martin Love Peace and Happiness Paper Pack
Amy Kingsford says, “This is an old photo of my son playing with a toy that we will soon be donating to another family. We lovingly called this playset “Buckey” after the ship on Jake and the Pirates.”
“I wanted to evoke a nautical feeling to convey the part of the story that this photo doesn’t make clear. I used fun patterned papers and nautical-themed elements. I combined a few of these patterns in vertical strips to make up my background, positioning a few lengths of grey twill ribbon to separate them and my oversized photo from one another. This creates a visual barrier between each pattern, making things a little easier on the eye. Also, using the same neutral color trim between each pattern creates a sense of unity.”

Ahoy! by Amy Kingsford | Supplies: Mommyish Designs: Life at Sea; Deena Rutter: Sail On Cutting Files; Creashens: Krafternoon Delight; Robyn Meierotto: In Stitches Basic Neutrals.
Amanda Jones says, “This layout showcases a small vintage photo I have of my Dad in the Navy. I used a number of strips of patterned paper as a foundation for my photo and embellishments to add definition. To separate the patterns a little I added German foil border strips between each section.”

Sailor by Amanda Jones | Supplies: Cardstock – Bazzill Basics; Chipboard, button, stickers, rub-ons, patterned papers, German foil borders – Jenni Bowlin Studio; Ledger paper- Vintage; Mist – Tattered Angels.
Barb Brookbank says, “This page is about taking time for a picnic and a rest beside a beautiful canola field, and how it makes a person appreciate the country.”
“I used pieced paper in a grid design, picking up the colors from the photo. Stitching and a mat behind the grid separate the patterned papers. The large beige paper also separates the background patterned paper.”

Relax & Enjoy by Barb Brookbank | Supplies: Papers and elements: Taking Time To Relax by Eva Kipler, Clipping Mask_Vol2 by Susie Roberts, All Stitched Up by Susie Roberts