
 The “themed” vacation is one that takes you into a created world where you are doing more than viewing, where you’re entering into and experiencing a manufactured reality. You may have gone on a Disney vacation, visited a historic settlement where you’re re-enacting the way things were done in the past, traveled to Santa’s Village, or many other variations on the themed destination.
The photos from a themed vacation can cover a lot of territory, and they don’t usually require a chronological telling. Aspects of a large theme/amusement park may include: characters, rides, performances, events, posed portraits, sights and more. Check out specific ideas for getting flow and rhythm for a theme-park-travel album and then check out ideas from our Creative Team for scrapbooking theme park outings.
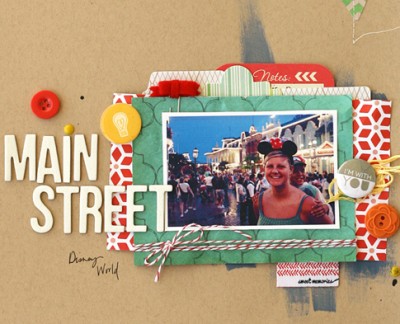
Leah Farquharson says, “This is still one of my all time favorite photos of one of our Disney trips! Probably my favorite part of Disney World is Main Street. There’s something extra magical about seeing it lit up at night.The two elements that I deliberately chose to match the photo were the lightbulb (to draw attention to the well-lit, nightime streets), and the red bow (which mimics the bow on the Minnie Mouse ears that my sister is wearing). The red, geometric patterned paper also repeats the bow on the hat, though I didn’t pick up on that until after I added it.”

Main Street by Leah Farquharson | Supplies: cardstock: bazzil. Twine and fabric letters, lightbulb button: American Crafts. File folder, fabric tag, green chevron paper, red/orange floral paper: Basic Grey. Buttons: October Afternoon. Flair: Ormolu. Page Pebbles: My Mind’s Eye. Patterned papers, ink, bow paper clip: Studio Calico. Paint: Jenni Bowlin for Ranger. Journal Card: Chic Tags
Adriana Puckett says, “We visited Disney World in January 2013 and really enjoyed the expanded ‘long walk in the graveyard’ for the Haunted Mansion ride. This layout theme gave me the excuse to pull out some Halloween items which is always fun in the spring. I used my silhouette to cut the spooky title and flourishes and finished it off with a plastic spider.”

Haunting Ride by Adriana Puckett | Supplies: Cardstock: Bazzill basics; Patterned paper: Basic Grey and Elle’s Studio; Brad: Stampin’ Up; Die-cut machine/designs: Silhouette Cameo
Stefanie Semple says, “We visited Universal Studios, and my children are such roller coaster fanatics, they would rather do these rides these than sight see. This page celebrates their adrenaline addiction. I love showcasing many photos and I was more than happy to stand on the sidelines and snap away than actually ride this monster, I felt ill just looking up at it. I gave a lot of real estate to this rocket ride, it was by far the most important thing to my children and I felt the layout should reflect this. I was taken by the attention to detail in the building facades so included some of that, some photos of the kids and parents – to prove we were all there, and that the Christmas decorations were being taken down, this all gives context.”
“The main colors of the ride are red and yellow, and I included them in my paper choices. The journaling block is gray, which is similar to the overcast sky in the photos. I added a sticker of a roller coaster ride, changing it with a linear burn mode blending mode and decreasing the opacity so that it is visible but the journaling is still easy to read. I added 4 photo corners to the layout to represent the constraints of the handle of their ride. I did not add a title since the photo of the globe shows that it was Universal Studios. I attached a piece of word art with a brad and screw to re-enforce the “secure your belongings” tongue-in-cheek word art/title. I added a spiky circular embellishment top left and bottom right to add a feeling of from sun up to sunset – all day enjoyment.”

Secure your belongings by Stefanie Semple: Janet Phillips at Sweet Shoppe Designs: 2 many photos 52 (template); Libby Prichett and Heather Roselli collaboration at Sweet Shoppe: Amuse me (kit)
Ashley Horton says, “After many visits to Disney World, we finally all got to go together as a family of five. One of our favorite photo spots is in front of Cinderella’s Castle in Magic Kingdom, and we had a family photo taken there. I have a separate Disney Album, but I wanted to include this layout in my everyday album, so I decided not to use the traditional Disney colors of black, red, yellow, and white. I used the Amy Tangerine Yes, Please collection to add a fun, bright look. The colors from this line also worked well with the colors of the clothing in our photo. And the bright colors and fun bits were a great reinforcement of my page title, ‘Happy Place.'”

Happy Place by Ashley Horton | Supplies – Patterned Paper & Bits: Amy Tangerine; Buttons, Tickets & Sticker: October Afternoon; Wood Veneers: Studio Calico & Freckled Fawn; Color Shine: Heidi Swapp; Flair Buttons: PandaEightDesigns; Font: Abadi MT Condensed Extra Bold
Michelle Houghton says, “The Alpine Slides at the Breckenridge Fun Park in Colorado are quite the ride, both getting up to them and sliding down. I wanted to show the whole process even though shooting a fast moving ride was not ideal. I used papers that looked like the wide open sky and cut out clouds from another to show how we rode up in the sky and into the heights of the mountain. I purposefully picked the yellow accents that highlighted the sleds that rode the entire trip with us, up the sky lift and down the mountain side. I even tucked in a ticket from our wild ride that showcased the ride location and name.”

Breck Alpine Slide by Michelle Houghton | Supplies: patterned paper and die cuts: American Crafts; ribbon and tulle: unknown; ink Sharpie
Audrey Tan says, “We visited Universal Studios in Singapore. Fortunately, it was low season when we went and, as a result, there were hardly any queues to the rides. We went on some of them a few times! I wanted to highlight some of the rides we went on and used a collage style to do this. I blended some photos in the background and showcased a couple of interesting ones. I used embellishments to block out faces of strangers.”

Relax O’Clock by Audrey Tan | Supplies: Anna Aspnes: Artsy Template No93, Love Glows No1, ArtPlay Embrace Life Brush Set, Cool Glows No2, ArtPlay Infatuated Brush Set, Cool Glows No1, ArtPlay Palette Family, Family WordArt No2, Multi Media FlutterBys No2, ArtPlay Palette Sunshine Bouquet
Font: Audalicious
Christy Strickler says, “We visited Busch Gardens and my son loved this boat ride in the Land of the Dragons. Theme parks are often broken into themed areas. This means I may have multiple stories to document from our trip. I like to break apart groups of photos according to each ride or area. I can then capture all of the events from our busy day. This area of the theme park was filled with colorful dragons. I captured the color of the pink, green, blue and orange dragons with my paper choices. I wanted a nautical theme to coordinate with the boat ride. However, I slipped in a small piece of blue paper which had a pattern similar to dragon scales.”

Lil Boat Captain by Christy Strickler |Supplies: Patterned Paper, Tape: Glitz Designs; Letters: Sassafrass; Die Cut: Silhouette; Mist: Pink Paislee; Other: twine, jewel, wood anchor, buttons, cardstock
Debbie Hodge scrapbooked what the mom on a band trip to Disney do at night here. “I’ve got lots of great photos of the kids and I will definitely be scrapbooking all of them, but I also wanted to record how the trip was for me in my off hours when I hung out with two of the moms. These photos are from a night at Downtown Disney eating at Bongos and then shopping for Legos.”
“I loved the combination of full saturated colors with the lighter tints an whites in this digital kit by Sahlin Studios for getting a sense of lighthearted fun. I included ‘Disney’ in the title and used bits of non-themed flair, bling and buttons to embellish. I used color to set the tone rather than turning to a themed Disney kit.”

Moms at Disney by Debbie Hodge | Supplies: Melon Sorbet Papers and Elements by Sahlin Studio; Puffers by Two More Days; Bits & Baubles by Ardent Sparrow; Flags and Stars by Jenni Bowlin Studio; Rules of the Road ALpha by Mye de Leon; Stuck On Alpha by Kaye Winiecki; Rules of the Road Alpha by Mye De Leon; Foxy by Gina Miller (journaler); Click by One Little Bird; Noted by Celeste Knight; Transparencies Chevron by Mye de Leon; Laugh Out Loud Alpha by Pink Reptile Designs; Flossy Stitches Orange, Flossy Stitches 2; Peachy Flair by Karla Dudley; Spiced Element Set by Anna Aspnes; Bohemian Typewriter font
[current]
