Sometimes, for something fun and different, I like to write my journaling in shapes—not just in a circle but spiraling around the edge of a circle or other shape. It isn’t practical for reading—the reader always ends up upside down and backward trying to read around the loops—but it adds a fun visual punch to your page and, sometimes, I find that the journaling is more for me this way. Here is one of my favorite journal blocks using this technique.
the how-to
1. As with the journaling blocks already described, you will need to determine the space need for your block at the beginning. I usually put these blocks on a separate sheet of paper, since they are complex to draw and, thus, easier to manage on smaller pieces. If you decide to do yours on a separate sheet, size that down now.
2. In pencil, draw the outer edge of your shape. In the example above, it would be my heart shape. The one I will walk you through is a circle, but the same directions will work for any shape. For these circles, I usually use a circle cutter or stencil. Writing around the edge makes even small flaws very obvious so it is better to start with a perfect circle. If you do not have a stencil or compass, grab a cup or small bowl to trace around.
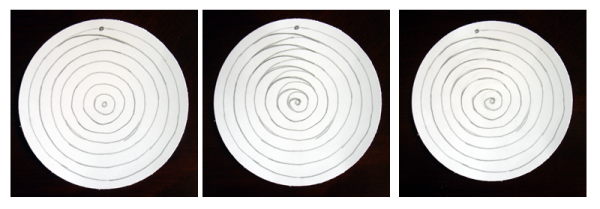
3. Eventually you might be able to take out these next 4 steps, BUT for today let’s make this as easy as possible. While this adds a little time, it might help you get your writing moving around your shape. Draw another circle about 1/4 of an inch inside your original. Continue drawing circles, each one gradually getting smaller by about the same 1/4 of an inch all the way around. Notice these circles are hand drawn and sketched, they are not perfect, they are just guide lines.
4. Pick a starting point, on the ring just inside your outer edge, for your writing and mark it with a dot. Turn your paper so the dot is straight up for now. Move your pencil about 1 inch to the left of your dot still on the ring and draw a gradually curving line from your first inner ring connecting it to your second inner ring. This is hard to explain in words so check the example.
5. You are going to connect all the rings this way moving from the outer rings to the inner rings. Connect the second ring to your third, your third to your fourth and so on… The curves that are doing the connecting should all be on the same side of your circle, so the shape all seems to curve inward at the same point.
6. Erase the sections of the original circles where the curves inward are replacing them. You should end up with one long continuous spiral.
7. The rest is easy! Lightly pencil in your journaling, and then go over it in ink. I do not go over my spiral line with ink. I feel the image is already complex enough so I erase my pencil lines, cut out my shape and attach it to my layout—that is: if I am still seeing clearly enough to get it on straight.

[lovejournaling][mhoughton]


