
 With a personal die-cut machine like the Silhouette Cameo, you can make layers and stencils for layout backgrounds. Our team has scrapbooking ideas here that use full-page die cuts for masked, textured and layered backgrounds.
layer a full-page cutout
Christy Strickler says, “We have noticed a change in my son’s behavior. He’s more mature, and I wanted to document the transition from boy to teen.”
“I like the layering that tone-on-tone cardstock stencil/diecuts add to a layout. I placed pieces of patterned paper under the stencil and then built upwards. I often use scraps behind the stencils. The scraps don’t always fill the whole space of a cutout area, but I like how it also adds texture.”

Mature by Christy Strickler | Supplies Cardstock: Colorbok; Patterned Paper: JBS Mercantile, October Afternoon, My Mind’s Eye; Letters: Basic Grey; Pen: Signo, Sharpie; Stencil: Jillibean Soup
Michelle Hernandez says, “The photo here is of my daughter sitting down at the Brooklyn Botanical Garden- a rare and beautiful occasion as usually she’s running into the flower beds, tramping through the river, or throwing rocks.”
“I started with an old Anna Griffin 12″ x 12″ die cut. I loved the green but it overpowered my small photo when used in whole. I realized I could bring in the green flipping it over and cutting out the middle and flipping that part over. I kept the color palette to three colors so I could focus on the photo.”

Untitled by Michelle Hernandez | 12×12 Die Cut: Anna Griffin; Patterned Paper: My Mind’s Eye, Crate Paper; Flair: A Flair for Buttons: Chipboard Slides: Crate Paper.
Stefanie Semple says, “I have been wrestling with my second son and struggling to see the light at the end of the tunnel. Too often his attitude affects mine. This layout is to remind me that it is OK to retreat, find a peaceful spot and something to appreciate – like these flowers. There is something good in the everyday if we take the time to see it.”
“I chose the blocked die cut to depict the constraints I feel, almost caged. The floral clusters are breaking out of these blocks and the focal photo lies above it. All signifying the truth, that I am free and not to be pinned down by my emotions, no matter how overwhelming they may be. I layered a blue matting behind the photo cluster in an effort to leave the blues behind.”

Hope by Stefanie Semple | Supplies: CrossBone cuts: Clip to it! Backgrounds 1; Litabell’s Designs and Stolen Moments: Strength in Hope collab.
Sue Althouse says, “This page is about stocking up on yarn with the good intention of starting and completing knitting projects.”
“When using a full-page die cut or stencil, a simple shape can be less intimidating. I chose arrows to represent all the different directions I could take with this bag full of yarn. After cutting the background with my Silhouette, I saved the kraft arrows for future projects and filled the negative space with patterned paper.”

Good Intentions by Sue Althouse | Supplies: Cardstock: Bazzill; Patterned Paper, Twine, Brad: Lily Bee; Border Punches: Fiskars; Alphabets: American Crafts; Buttons: October Afternoon, Lily Bee; Floss: We Are Memory Keepers; Die Cut: Silhouette; Crochet Hearts: Bella Blvd.; Wood Veneer Arrow: Freckled Fawn
Marie-Pierre Capistran says, “I used a 12″ x 12″ die cut full of speech bubbles to document the cute things my daughter is saying at the moment.”
“This die cut is what was left once I used my Silhouette to cut out speech bubbles. I backed each speech bubbles with either colorful patterned paper or ledger paper for holding handwritten journaling. On the right side of the die cut there is a fairly large band without speech bubbles. To balance the page I filled this space with the speech bubbles that I had cut out from this cardstock.”

Mom, Are You Listening? by Marie-Pierre Capistran | Supplies: Cardstock: Bazzill; Patterned Paper: Bo Bunny, Amy Tangerine for American Crafts; Letters: Dear Lizzy Thickers for American Crafts, Amy Tangerine for American Crafts; Spray mist: Heidi Swapp; Others: Silhouette Cameo, Sewing machine, date stamp, plastic bag I had in my stash.
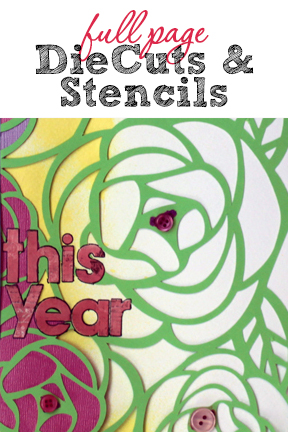
Kiki Kougioumtzi says, “This layout is about the flowers we got this year from our garden.”
“The green 12″ x 12″ diecut I used here was cut with the Silhouette Cameo. It’s a Dear Lizzy design that was previously sold cut from American Crafts. I used it to add color and interest to plain cardstock, backing up some spots around my photo (as a photo mat) with additional cardstock pieces. Other openings were used for journaling. I didn’t completely adhere the piece to the base, which lets the die cut lift freely, creating shadows and dimension.”

This Year by Kiki Kougioumtzi | Supplies:Cardstock:Canson,Bazzill Basics;Alphas:Bo Bunny;Other:Tattered Angels glimmer mist,Silhouette Cameo,Efco deco balls,buttons.
use the diecut as a stencil for texture and pattern
Kristy T says, “This layout is about Father’s Day in 2011. It records a family traditions and the joy the kids have when giving handmade presents to their dad.”
“I used texture paste and a 12″ x 12″ punchinella stencil to make a textured white-on-white background. This stencil has 3 strips of different patterns which create textured horizontal bands. I placed most elements on my page horizontally. I arranged my photos in a grid style and left a gap into between to allow the white card underneath to show and to give the illusion of the photos being matted by white borders. My photos were bright and fun so I kept the embellishments simple.”

Happy Fathers Day 2011 by Kristy T | Supplies: Card: Artee; Template: The Crafters Workshop; Texture Paste: Jo Sonjas; Border Strips: Teresa Collins; Chipboard: Teresa Collins; Patterned Paper: Simple Stories; Paper: Reflex; Stickers: Simple Stories; Twine: Maya Road; Wood Icon: Prima Marketing
Audrey Tan says, “The page is about shopping with my best friend who came over from Shanghai. Our hubbies had the kids and we went off to enjoy our favorite activity.”
“I wanted the page to be very ‘girly.’ I used a 12″ x 12″ damask mask and painted it onto the background page. I used blending modes to make it appear like part of the patterned paper.”

Small Wonders by Audrey Tan | Supplies: Splendid Fiins: Knockout Vintage Wallpaper; Courtney’s Digiscrappin: Your Life; Font: Sue Ellen Francisco
Rosann Santos-Elliot says, “It was fun to create my own patterned paper with a full-page stencil. Though the final product looks complex, it was simple to complete. I used an 8.5 x 11 inch stencil on white cardstock with pink ink. I added Tim Holtz Distress Stain to tone down the white cardstock and age the flowers. Finally, I added Glossy Accents over some areas of the stencil to get shine and dimension. To enhance the stenciled background, I stenciled a tiny area onto a small tag.”

Sister Friends by Rosann Santos-Elliot | Supplies: Patterned Paper: My Mind’s Eye; Alpha: Amy Tangerine; Ormolu button; Stencil:Martha Stewart; Wood Veneer: Studio Calico; Petaloo Pin; Ink: Stampin UP
Susanne Brauer says, “The story here is about the kidding around that goes on between family members. The forward picture was taken this past Mother’s Day and it reminded me of another picture from just a couple of years ago. Both my son and I think we are hilarious at times – and often the other has to admit it’s true.”
“I started with a die-cut paper from Studio Calico and punched additional symmetrical circles to break up the design and add interest. I used two journal cards for the first part of the title and finished with chipboard letters. I liked playing with the pastels against the kraft background. I also thought that since I was framing the pictures, it would be interesting to change the photos to sepia.”

He Said, She Said… by Susanne Brauer | Supplies – Studio Calico die-cut paper altered with 1 3/8 circle punch, October Afternoon Art Box mist, Elle’s Studio Quotable and Lil’ Snippets journal tags, Maggie Holmes Stitched frames, A Flair for Buttons badges, Heidi Grace fabric covered brads, Thickers Flat and Venus chipboard alphas, Stampin Up stickers.
Debbie Hodge says, “This is a quiet photo of my son and a friend at the river preparing to go out on kayaks. I used a full page stencil and a digital misting brush to create the backgrounds.”
“With digital masks/stencils, it’s easy to fill in EITHER the positive or the negative of the shape. You select the mask — and then if you want the opposite you >Select >Inverse in Photoshop, create a new layer and then apply the misting brush to that selected area. I applied the misting heavier at the top left and bottom right corners of the page to create asymmetry and a downward diagonal flow.”

Moment by Debbie Hodge | Supplies: Just Linens 1 by Maplebrook Studios; Stencils 3 by Creashens; Frolic by Paislee Press (journalers); Stitched by Anna Borders White by Anna Aspnes; Color Your Own Alpha by Zoe Pearn; Buttons: Innocence by Wild Blueberry Ink, Brad Bonanza by Pattie Knox, Sprinkles 9, The Good Life, Snail Mail all by Valerie Wibbens, Sunshine ATT by Tangie Baxter, Happy Hipster by Amy Wolff, Peachy by Karla Dudley, Deco brads by Karen Funk, Hello Goodbye by Traci Reed, Fig by Sara Gleason; Shadow Styles by One Little Bird and Sahlin Studio; Bohemian Typewriter font.
[current]
