
 When you make your own scrapbook page embellishments or other elements you personalize your layout homemade appeal.
Our team’s pages here each have “handmade” pieces–though you should note that for digital scrapbookers the DIY work is done with digital tools. Check them out![hr]
Celeste Smith says, “This page is about my son participating in his final Pinewood Derby.”
“I love patterned paper but have never made my own digitally. I thought it would be fun to give it a try. I made all of the patterned papers you see here. The majority of the paper was made using ‘Commercial Use’ digital overlays or .PSD templates. To use them, you fill the different areas with color. I made the car paper using the car image and the tutorial found on The Coffee Shop Blog. I finished them by applying a texture to each of the papers for a more realistic feel.”
Download Celeste’s papers here and use them in a page of your own.

Let The Good Times Roll by Celeste Smith | Supplies: Celeste Smith: Go Patterned Paper; Just Jaimee Storyteller February 2016 kit; Font: Underwood Champion.
Marie Pierre Capistran says, “This page is about a summer camp I was visiting when I was a kid. It includes two letters I found that my mom wrote to me as I was at camp.”
I made two ‘pocket-style cards’ for this page. When i saw the collection I would use from Crate paper, I wanted to add the little cloud card and I thought it would be fun to incorporate more cards like this. I created the orange one with the sail boat to go along with the song lyrics I wrote on the card. The blue card in the upper corner I made to add a splash of color.’
Here’s how I made my own cards:
- I created a new document in Photoshop sized 3″ x 4″.
- I painted a watercolor background and scanned it. I opened the scan in Photoshop and dragged it onto my document.
- I traced my little sailboat on a white piece of paper and scanned and opened it with Photoshop as well. I deleted all of the background and fill areas. I selected the sailboat outlines and ‘filled’ the outline with white. I layered it on top of my watercolor layer.

Camp St-Vincent-de-Paul by Marie-Pierre Capistran | Supplies: Cardstock: Bazzill; Paper: Crate Paper; Cards: Marie-Pierre Capistran; Alphas: American Crafts; Paperclip: American Crafts; Ephemera: Crate Paper; Stickers: Crate Paper; String: Lawn Fawn.
Deborah Wagner says, “This is a photo of my lovely daughter shortly after we adopted her. She is now 21, but many of my pages are still created to remind her that our love is forever.”
“I like glitter and usually add a little sparkle to every page I create. I searched YouTube, and found several videos about creating glitter in Photoshop. Nothing I watched gave me the look I wanted, but I learned much about pattern overlays and blend modes. Using tips from the video , I was able to create a glitter style I liked using the shredded plastic pattern overlay. Click here to download my glitter style.”
You can load it into Photoshop or Photoshop Elements and apply the style to any element you choose.
- To change the color of the glitter, open the color overlay effect in the layer style; and pick a color that coordinates with your layout.
- You may have to change the blend mode of the color overlay, depending on the original color of the element.
You can also use brushes to create a glitter scatter.
- When using brushes, adjust the settings in the brush panel. Play with spacing in the brush tip settings, change size and/or angle jitter in shape dynamics, or the count in the scatter setting.
- Once the style is applied, keep adding brush strokes to add more glitter.
- There is no right or wrong way to create a glitter scatter. You can use any shape brush, and change the settings each time. The only rule is to have fun and sparkle!

Forever by Deborah Wagner|Supplies: KimB – Pretty Shabby, Forever Friends, A Little Focus, Free Spirited, Pop of Pretty, Positively Beautiful, Salty Kisses; Anna Aspnes – From Russia With Love; Sahlin Studio – I’ll Love You Forever; Katie Pertiet – Letterbox Clusters No. 7, Artsy Paint No. 6, Painted Floridian; Anita Designs – Hello March Overlays
Marcia Fortunato says, “This layout is about our recent return to seasonably typical weather after experiencing unusually early Spring-like temperatures, reminding us that winter was not over after all!”
“In my title I used a combination of letter stickers and a hand-cut title. I wanted to emphasize the word winter with a script font. Although I could have cut it with the Silhouette machine that I own, sometimes I find it faster to cut the word by hand. It is simpler than you might think. I started with a heavy-weight watercolor paper (although a lighter cardstock or paper can also be used) and wrote the word very lightly in pencil using a wide, loose script. Then using a normal pair of scissors I first cut the inside of the e, then cut around the remainder of the word using the pencil marks as a guide. It works best to move the paper rather than the scissors while cutting. When you’re done any rough edges can easily be smoothed out by using your fingernail or a file or by trimming a little with your scissors.”
“In addition to the hand-cut title, I used some small stamps to add subtle embellishment. I like to use these little stamps to fill in empty spaces, especially trapped white space, and to help move the viewer’s eye around the page.”

It IS Still Winter by Marcia Fortunato | Supplies: Patterned Paper: Amy Tangerine (American Crafts), Jen Hadfield, Strathmore watercolor paper; Letters: Jenni Bowlin Studio, handcut; Embellishments: Fancy Pants Designs, Freckled Fawn; Stamps: Cocoa Daisy, Studio Calico; Ink: Studio Calico Color Theory, Memento (Tsukineko); Pen: LePen (Marvy); Other: QuicKutz die, Prang watercolor.?
Summer Christiansen says, “This page is about a trip I took with my kids to California in the Summer.”
I sketched the sun brush in the top corner using my Wacom tablet in Adobe Illustrator (you could also use Photoshop). To create my background I took a photo of a mountain and used the Liquefy Filter in Photoshop and swirled it all together. Because I had so many colors in the original photo, I was able to make whole set of papers using different areas of the photo.”
To learn more about how Summer made her products check out her liquefy tutorial and sun element tutorial.

This is Sunshine by Summer Christiansen | Supplies: suludigialdesigns.com
Christy Strickler says, “When my son was small, he would stuff his backpack with toys, travel around the house, find a post to dump it out, then repack it and repeat the process.”
“The resin hearts on my page were made using hot glue and a silicone cake decorating molds. Once the glue dried, I painted them with puffy paints.I have a lot of silicone cake decorating molds that include basic shapes. Rather than buy lots of resin shapes, I can make the ones I need as I need them. Hot glue comes clear or even in colors now. I can use the shape as is or paint it to match my page. It’s simple to create, just put hot glue in the mold, allow it to dry, and it pops right out.”
“The wood arrows in the title were hand cut from a sheet of thin wood veneer. I didn’t have a small enough arrow in my stash. Hand cutting them allowed me to make the arrows the size I needed. The flair badge was made with a button kit I found in the sewing section of the local craft store.You don’t need any special tools, just the kit, some cloth or paper, and a bit of glue.”

Pack Carry Empty by Christy Strickler |Supplies Patterned Paper: Cocoa Daisy, Pink Paislee; Letters: American Crafts, Basic Grey; Die Cuts: Pink Paislee, Studio Calico;Wood Veneer: EK Success; Other: tape. photo corners,stickers, button, molded shapes, glue
Amy Kingsford says, “This page is about my love/hate relationship with rain. I used homemade clear enamel dots to recreate the look of water drops.”
“I love enamel dots! They are a fun and simple way to add pops of color and dimension to any page. If I could afford it I’d own a sheet of them in every color known to man. It was that mindset that led me to try figuring out a way to make my own enamel dots. I tried several different methods before finding one that worked for me and allowed me to make realistic dots in color I like, even clear.
You can find Amy’s tutorial for both colored and clear enamel dots here.
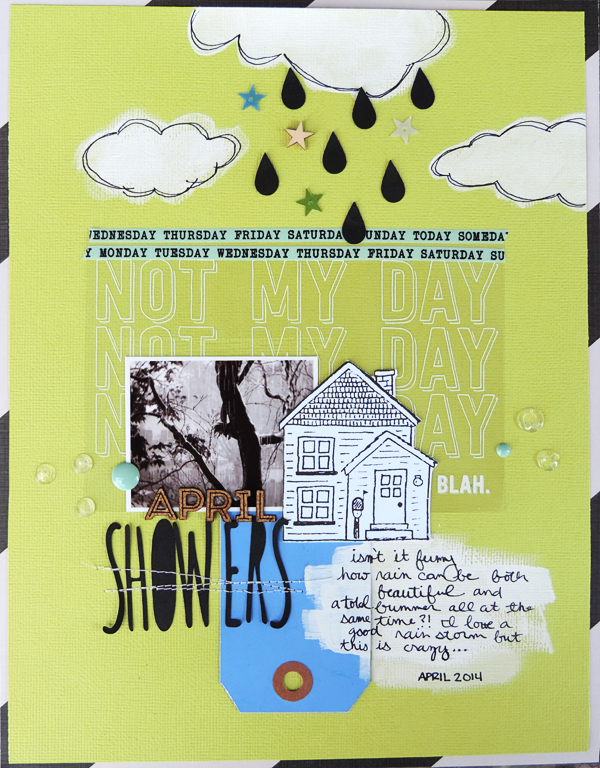
April Showers by Amy Kingsford | Supplies: Studio Calico: Office Hours, Blue Grass and Copper Mountain Scrapbook Kits; My Minds Eye: Mint Enamel Dots; Cut Files: Amanda Robinson Studio; Other: Gesso, Sharpie, Glossy Accents.
