by Debbie Hodge
Knowing what you’re good at and what you like makes getting scrapbook pages made easier. Know what your masteries and aesthetic preferences are and work them.
See how our team and teachers describe their “go-to” embellishment approaches–and, as you do, consider what your favorite approaches are and how you can leverage them in order to efficiently make pages you love looking at.
embellish with layered shapes
Leah Farquharson “This page is about how I have loved being able to add lots of personal little touches to our home and my creative space recently. Little things really do make me happy.”
“One of my current favorite ways to embellish is to include fun feathers and layered elements. My husband bought me a Silhouette Cameo for my birthday, and I’ve been putting it to fun use by layering shapes on my layouts. On this page, I layered several square sheets, several diecut shapes, and placed them all on a background with chevron cut shapes. The feathers grace the side of the page in a pretty accent.”
“I use this technique again and again because layering multiple elements creates depth and movement. It’s easy to do over and over with the broad variety of shapes available for my new die-cut machine.”
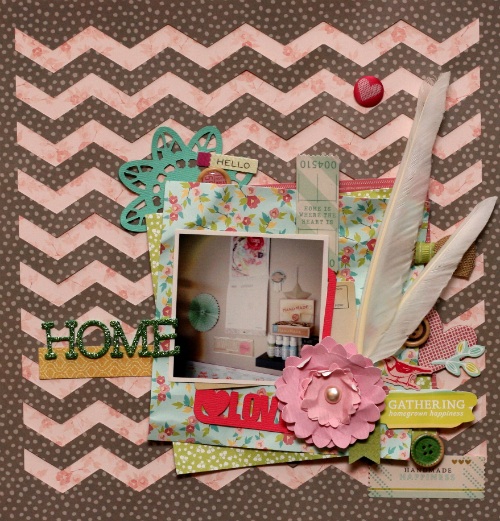
Home by Leah Farquharson | Supplies | patterned paper, brads, epoxy buttons, flower, foam letters, burlap bow, cardstock, tags: American Crafts. Silhouette cuts: JBS Mercantile exclusive kit cuts, American Crafts.
fussy-cut and recycled embellishments
Christy Strickler says, “This page has a rare shot of my son snuggling with our older cat.”
“I am a frugal scrapbooker. I use methods like fussy-cutting and recycling to stretch my supplies. I begin this layout knowing I wanted to use a little paper bag I got on my last trip to the pharmacy. After stitching it to my canvas, I began sticking and tucking various elements onto the page. I always put adhesive at the center of photos or patterned paper so that I can tuck in fussy-cut embellishments as I work.”
“Working with threes and using a visual triangle are a go-to design principles for me. There are three fussy-cut doilies on this layout; I have sewn three boxes around the base of the patterned paper, and there are three blue items arranged around the photo. When I first started making visual triangles, all of my triangles were composed of the same type of embellishment. Now I mix things up a bit as illustrated by the blue elements here.”
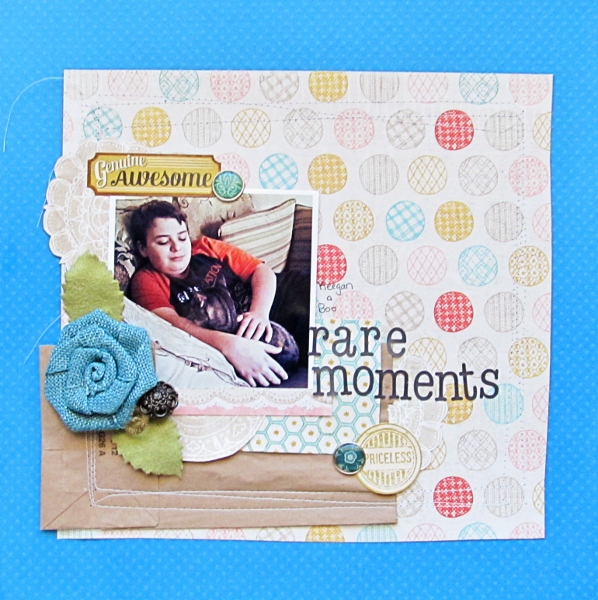
Rare Moments by Christy Strickler Supplies| Cardstock: Bazzil; Patterned Paper, Stickers,Alphas, Buttons: Basic Grey; Brads: October Afternoon; Flower,velvet leaves, paper bag
embellish with a visual triangle
Deborah Wagner says, “I am a very literal embellisher. If the page is not about one of our dogs, you won’t find a puppy epoxy on it. I also tend to be a minimalist when it comes to embellishing. This is probably one of the most heavily embellished pages I’ve ever created.”
“My first go-to-technique when embellishing is the visual triangle because it’s easy, and you can use it to draw the eye to the most important parts of your page. I’ve used it several times on this page: on the frame, the screws fastening the vellum, and the pops of red.”
“My second step is to embellish my title. I usually like to weave something through the letters (here I wove the word “or” through the dot on the “i”), but I may use ribbon or twine; then add an epoxy or sticker.”
“My third step is to see where I want to draw the viewer’s eye. Here, I added a red photo corner over the vellum because it points to the blended photo of my daughter. Lastly, I try taking embellishments away, to see if there is anything that isn’t vital to the page. This can take me days!! Finally, I either get sick of looking at it or, at last, it feels complete.”
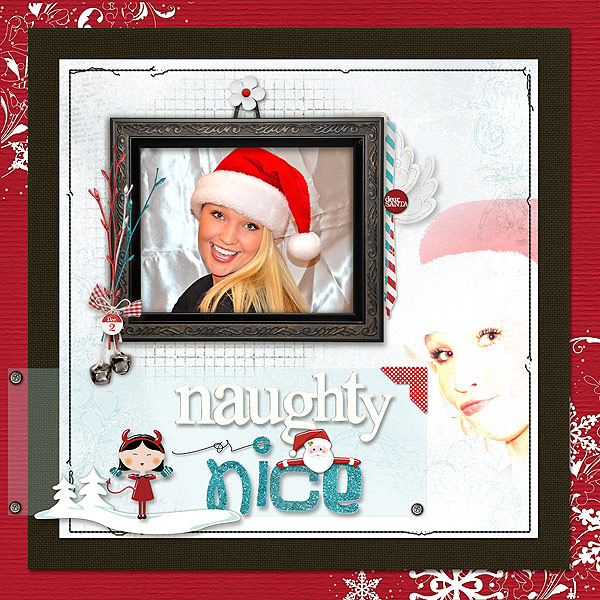
Naughty or Nice by Deborah Wagner. Supplies from Designer Digitals: Katie Pertiet – Woodside Jangle Kit, Hung Up Photo Frames No.4, Pinned December Dates No.2, Santa Wrap Frames No.1, Blitzen Kit, Jackfrost Kit, Snow Fun Kit, Spooktacular Kit, Sweet Nicholas Kit, Messy Stitched White No.2, Nothing Sweeter LT, Hinge Pack, Photo Corners No.3; Patty Knox – Very Merry No. 3, Be Mine Alpha; Ali Edwards – Essential Words Hand Drawn; Maplebrook Studios – Annelise Solids, Lynn Grieveson – Elise Alpha,
sewing, stamping, and fussy-cutting for embellishments
Marie-Pierre Capistran says, “This is a double page layout (8.5×11) I made to celebrate and illustrate the word I chose this year: learn.I used pocketed page protectors filled with small 3 x 3.5 cards. I embellished each card, one by one.
“When I embellish my pages, no matter what the format, I tend to use the same techniques over and over again:
“I love my sewing machine and have it out on my desk so that I can use it often. I almost always sew around my pictures and my journaling spots. I also like to sew embellishments together in a cluster (the three hearts here) or over one another (the chipboard heart under the vellum heart) and attach small elements to my page with my sewing machine like I did here with the small tags that indicate the months.”
“Stamped and fussy-cut embellishments make it on to most of my pages. Here I stamped the little house three times (twice on white cardstock and once on blue cardstock). I mounted the second layer (the blue one) on the white one with foam dots to give it dimension. Another alternative to fussy cut is punching. Here I punched the smaller circle but I fussy cut the bigger ones because I had no punch of those exact sizes.”
“Stamping is also fun and versatile. Here I went crazy with letters, especially on the title card. I stamped my word over and over again in one color (blue) and stamped it once in red so that it would stand out. On the other cards I used 2 different fonts and 2 different size of letters. I once again used 2 colors.”
“Finally, I like to use small letter stickers. I used them here for 2013.”
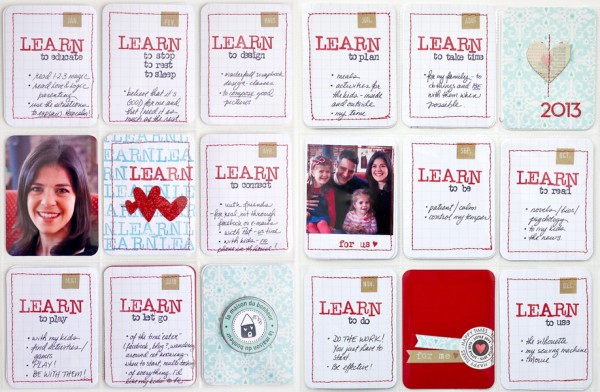
Learn by Marie-Pierre Capistran | Supplies: Cardstock: Bazzill, SU!; Paper: Project Life cards; Stamps: Inque Boutique, Hampton Art, Inkadinkadoo, Florileges, Date stamp; Chipboard heart: AC Dear Lizzy; Vellum paper: Dear Lizzy; Letter stickers: Making Memories; Punch: SU!; Other: glossy accent.
texture techniques for embellishing
Jennifer Matott says, “I love to create interesting areas of my page with cut outs, texture, and shine. This page is all about my boys and how they love each other but are brothers with brotherly ‘push/pull’ relationship.”
“I have a go-to embellishing approach in which I add texture through modeling paste and paint. I love creating repetitive symbols through shapes. In this case, I used the triangle, or arrow, motif. I keep coming back to using stencils with modeling paste through it.”
“I also love to use glue or paint to create drips or droplets on the page and then I add glitter or embossing powder to the areas. I keep using this technique because it adds texture and can be used anywhere on the page–even over layers! I love the flexibility it provides. Sometimes I use unusual found objects as stencils or tostamp into the paste.”
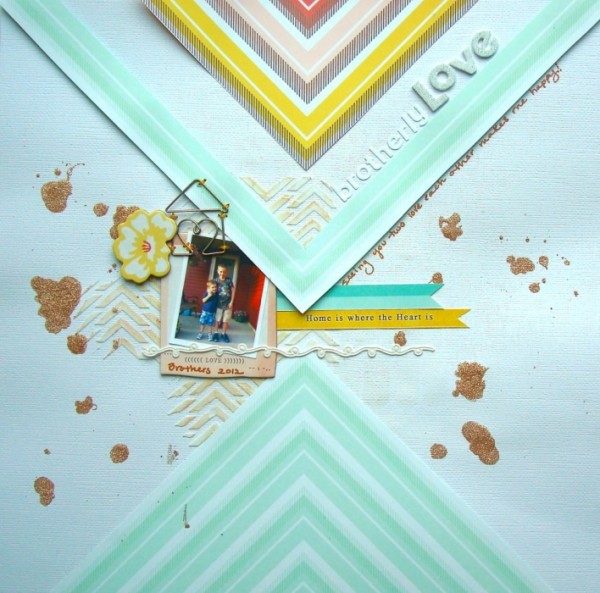
Brotherly Love by Jennifer Matott | Supplies: All papers and embellishments from Scrapbooking From The Inside Out “Harmony” kit.
Modeling Paste: Golden
Adhesive: Helmar
Glitter: The Rubber Cafe You’re So Fine Glitter
embellish with subtle charm
Stefanie Semple says, “This page is about the scrapbooking ladies group I teach and our once-a-year for breakfast gathering.”
“I love embellishments that add charm and detail without drawing attention away from my photos. Here, my first embellishment is a subtle cluster to cover an ugly sign in the foreground of the venue photo. Next I placed two floral groupings on either side of the layout, bottom left and top right creating asymmetrical balance.”
“I love to weave elements to add to the dimensional feel of the layout, including a metal embellishment in both groupings. I placed lace underneath the photo strip to add a feminine touch, I love lace and flowers and they are a great complement to a page about women. The lace was tucked under more at the top than the bottom, so that it looks like two different types of lace.
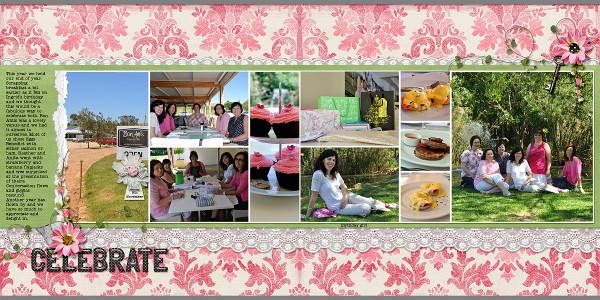
Celebrate by Stefanie | Supplies: LDrag Designs (kit): Chic Elegance, Janet Phillips (template): 2 many photos 81, Bella Gypsy (alpha): Hot Dots Alpha
place embellishments in a loose curve
Doris Sander says, “I never intentionally set out to do this, but I find that time and again I come up with page designs in which I’ve scattered embellishments in a loose curving line down the page.”
“On ‘We Miss You When You Fly,’ you’ll see one embellishment cluster on the left that balances the flow of embellishments on the right that goes from the thumb tack at the top of the page to the feather tip at the bottom. This look is a fun way to get a lot of embellishments on the page, but keep them in a cohesive unit that works with the design without overpowering it.”
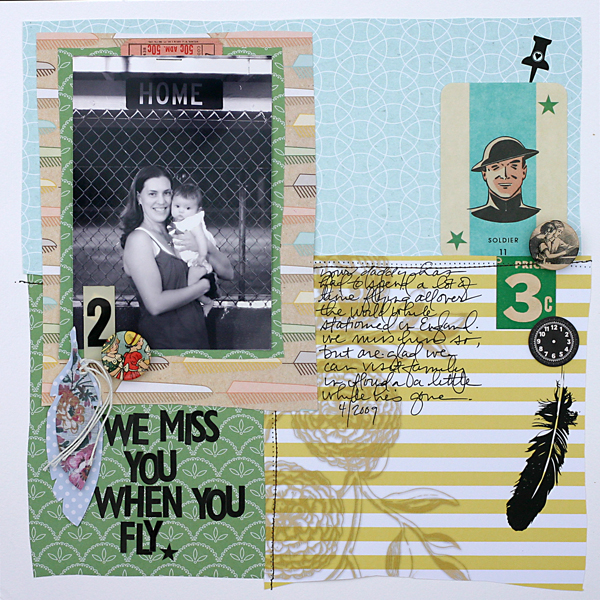
We Miss You… by Doris Sander | Supplies: patterned paper, feathers, stickers, rub-ons, chipboard, flatbacks – Jenni Bowlin Studio, ephemera – vintage
embellish with patterned paper shapes
Katie Scott says, “My favorite way to embellish is with a mix of patterned papers. This layout incorporates lots of patterned papers with long banners. I cut strips of patterned papers from the same paper line and then cut the banner edge using a square punch to make the upsidedown V shape at the bottom.”

Celebrate 2013 by Katie Scott | Supplies: Recollections Neapolitan Collection Paper Pack and DCWV Paper (bracket paper); Marvy Uchida Large Square Punch; stickers from Studio Calico and Crate Paper.
keep embellishing simple
Tami Taylor says, “Embellishing is always a struggle for me. I love the embellished layered look but never seem to achieve the same level of artistry that the scrapbookers I admire do. I have found I like more of the pages I make that are simpler in reference to embellishments but more complex in terms of paper patterns and layers.”
“On this page I wanted to do a messy background without actually making a mess so I used patterned paper that was a mixed media print. I layered different sheets of the paper with washi tape. Because the background was complex I used simple embellishments – a few brads and a butterfly clip.”
“For me, this approch is the easiest. The more embellishments I layer, the more difficult it is for me to find balance and follow design rules. With simpler layouts, it’s a few steps and you’re done. I hope that as time passes I’ll feel more comfortable adding more to my layouts as I truly do love layered up pages.”
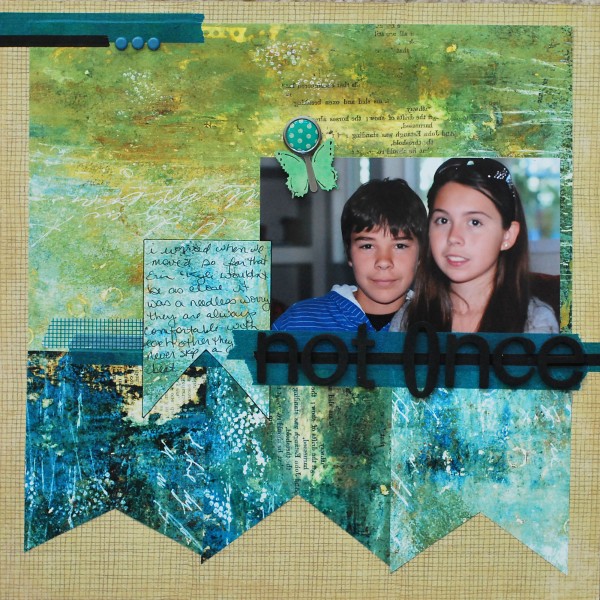
Not Once by Tami Taylor | Supplies: Paper – Unknown, Stampington Artists’ Paper. Embellishments – Unknown.
hand-drawn lines
Anna Aspnes says, “I love ArtSrokes and SkinnyLines that make my layouts my own. In my mind no page is complete without one of these abstract hand-created lines. They are a great way to create frames, form artistic boundaries, provide interest to solid backgrounds and they are just plain fun to use.”
“I used 2 different SkinnyLined Overlays on the solid background of my layout here.I usee ArtStrokes and SkinnyLine Overlays because they are an easy addition to a page and add instant Artsy flair. When I feel like a page is missing something, I can add one of these and it immediately fills the void.”
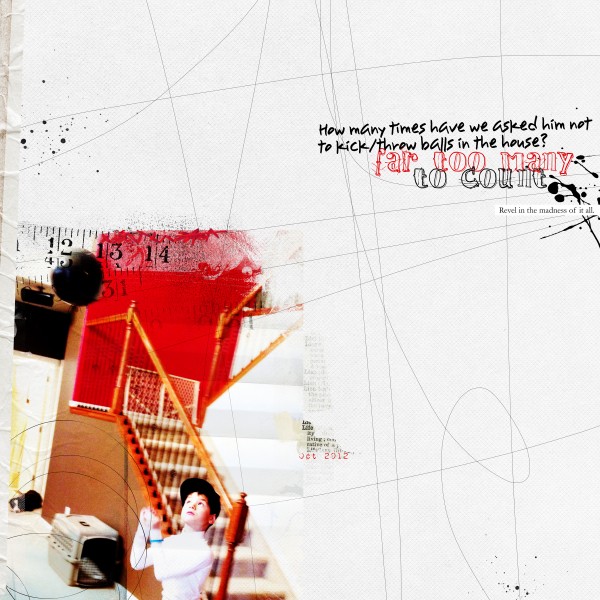
Balls in the House by Anna Aspnes | Supplies: ArtPlay Palette Crazy Life, SkinnyLined Overlays No. 2, TapedNumbers No. 1. Fonts: Youngsook BTN, 1942 Report, Jamaistevie
[current]

