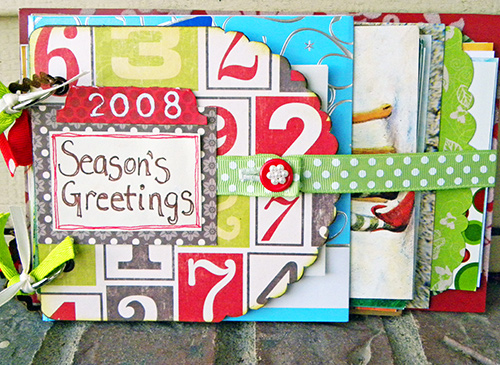
I love looking in my mailbox each day of December to find Seasons Greetings from out-of-town relatives, or the beautifully handcrafted card I get each year from my cousin Holly, with a cheerful picture of their family tucked inside! During the holidays we hang the cards in the archway that leads from our living room to our dining room, for all of our holiday visitors to see! But once the gifts are all unwrapped, and the decorations are all put away…what do we all do with our cards then?
Some of us simply remove the photos that have been included and toss the cards, others :raising hand: throw them in a box never to be seen or heard from again. The point is that very few of us do something with our Christmas cards, not because they’re not important to us, but because we don’t have the time or we are simply at a loss with what to do with them! Well NO MORE! Give this idea a quick try and you’ll be storing your Christmas cards in style in no time!
Holiday Card Holder
SUPPLY LIST
- Your Stash of Christmas Cards
- Ribbon (2 ft)
- Chipboard Mini Album Page/Large Chipboard Element/ Scrap Chipboard (a cereal box would work!)
- O-Ring Clasps (1-3)
- Patterned Paper/Elements/Extra Ribbon
- Sewing Machine (alternate steps provided for those who don’t sew)
- Adhesive
- Scissors
- Hole Punch
- First gather all of your cards for the season (previous seasons too if you like) and arrange them by size, with the longest cards on the bottom and the shortest/smallest on top.
- Using a bought chipboard page, a large chipboard element, or even a scrap piece of chipboard (a cereal box will work if you have nothing else) decide the shape and size of your front cover (and back if you choose to do so).
- After lining up your cover with your cards, select the number and placement of the holes for your rings. Consider what will be necessary to keep your cards intact when someone is flipping thru the album. If you have several large cards you may want to go with three holes/rings, however, if most of your cards are very small then you may be able to get away with just one. You be the judge!
- Using a Crop-a-dile (or an eyelet punch or basic hole punch) punch the necessary holes through your chipboard and cards. You may want to consider punching each size grouping of cards separately…to avoid misplaced punches.
- Next cover the chipboard piece with your patterned paper, using adhesive and re punch your holes thru the paper. Then thread your rings thru the cover and cards to keep the booklet intact throughout the rest of the crafting process.
- Now you must decide what type of a ribbon closure you would like…the kind I have illustrated here is a button enclosure that is stitched to the chipboard and uses a machine stitched button hole, but if sewing is not your thing, then you can simply make the necessary adjustments in the measurements of your ribbons, secure them with an adhesive or decorative staple and then tie the two pieces of ribbon in a bow.
- Now choose a simple design for your title and year for your card keeper, but do not adhere any of the mats, or elements to the front cover just yet, because you must first adhere your ribbon, in such a way that the spot where you attach it on your front cover, it will be covered by your title and design elements.
- Using a doubled piece of ribbon (double by folding…as it will be used to create a tab) long enough to reach from the point of attachment to roughly an inch from the right edge of your chipboard cover, use your sewing machine to create a button hole centered down the ribbon starting about a half an inch from the fold in the ribbon and sewing out towards the raw edges.
- Adhere the raw edges of your buttonhole tab to the attachment point by stitching the ribbon to your chipboard cover.
- Now take a second piece of ribbon (give yourself a pretty good length to work with) and stitch one end to the back edge (the same edge that will be bound by your rings) of your last card or back cover if you have chosen to make one. Then pull the ribbon tight around to the front of the card, until it is overlapping your buttonhole mark the position for your button to be sewn and then cut the ribbon to a length which reaches just past the button pull (measure twice cut once…but don’t give yourself a whole lot of slack, keep the ribbon pulled tight–most ribbon is cut on the biased so it has a little give).
- Sew your button onto the second piece of ribbon and then make sure your closure works properly.
- Now you are ready to decorate your front cover by adhering your title, year and other elements, and adding any final touches, like tying ribbons around your rings if your wish.
Voila…now you have a quick and easy way to store your Christmas Cards in style year after year! Hope you have a wonderful Christmas filled with lots of holiday cheer and many season’s greetings!
[akingsford]


